
7 Steps to Build Your Own Satellite: A DIY Space Journey
Have you ever gazed up at the night sky, filled with wonder, and thought, “Could I really put something up there?”. What if I told you that sending your own creation into space isn’t just a dream for seasoned NASA engineers anymore? It’s becoming a reality for everyday civilians, folks just like you and me. Imagine creating something that zooms five miles per second, far above our planet, with the sole purpose of taking your selfie in space, Earth photo-bombing majestically in the background! How cool is that? This isn’t science fiction; it’s the story of SATGUS, a custom-built satellite designed for this very purpose.
So, if you’re ready to embark on an incredible journey and learn how to build your own satellite, get ready! I’m going to walk you through a practical, seven-step crash course, sharing the exact same principles learned from years of working on projects like the Mars Rover.
Step 1: Designing Your Spacecraft – The Digital Blueprint
Every grand creation, whether it’s a Mars Rover, an iPhone, or even a simple hammer, begins with a digital design. That’s where CAD, or Computer-Aided Design, comes into play. It’s the critical first step for visualizing your project and making crucial design decisions. For a project like SATGUS, which took months in this phase, CAD allowed us to meticulously plan every component and its placement.
The Genius of CubeSat Technology
Now, here’s a pro tip that can save you millions of dollars and countless hours: don’t start from scratch. About 25 years ago, some brilliant minds at Stanford realized that every satellite needs fundamental elements – solar panels, radios, computers, and more. So, they standardized the necessary hardware and sizes, giving birth to the CubeSat.
Think of it like this: a 1U CubeSat is just a little bigger than a Rubik’s cube. You can scale up from there to 2U, 3U, 6U, and even 12U, which is the size we chose for SATGUS. The beauty of CubeSat technology is that the basic functional hardware, like the flight computer, is pre-designed to fit into a standardized space, leaving you ample room for your unique “payload” – the core purpose of your satellite. For SATGUS, our payload was a camera and a screen for taking pictures. Building a CubeSat can reduce your development costs by a factor of 100, bringing it down from tens of millions to hundreds of thousands of dollars. Isn’t that an incredible leap for accessibility?
Inside SATGUS: A Peek at Practical Satellite Design
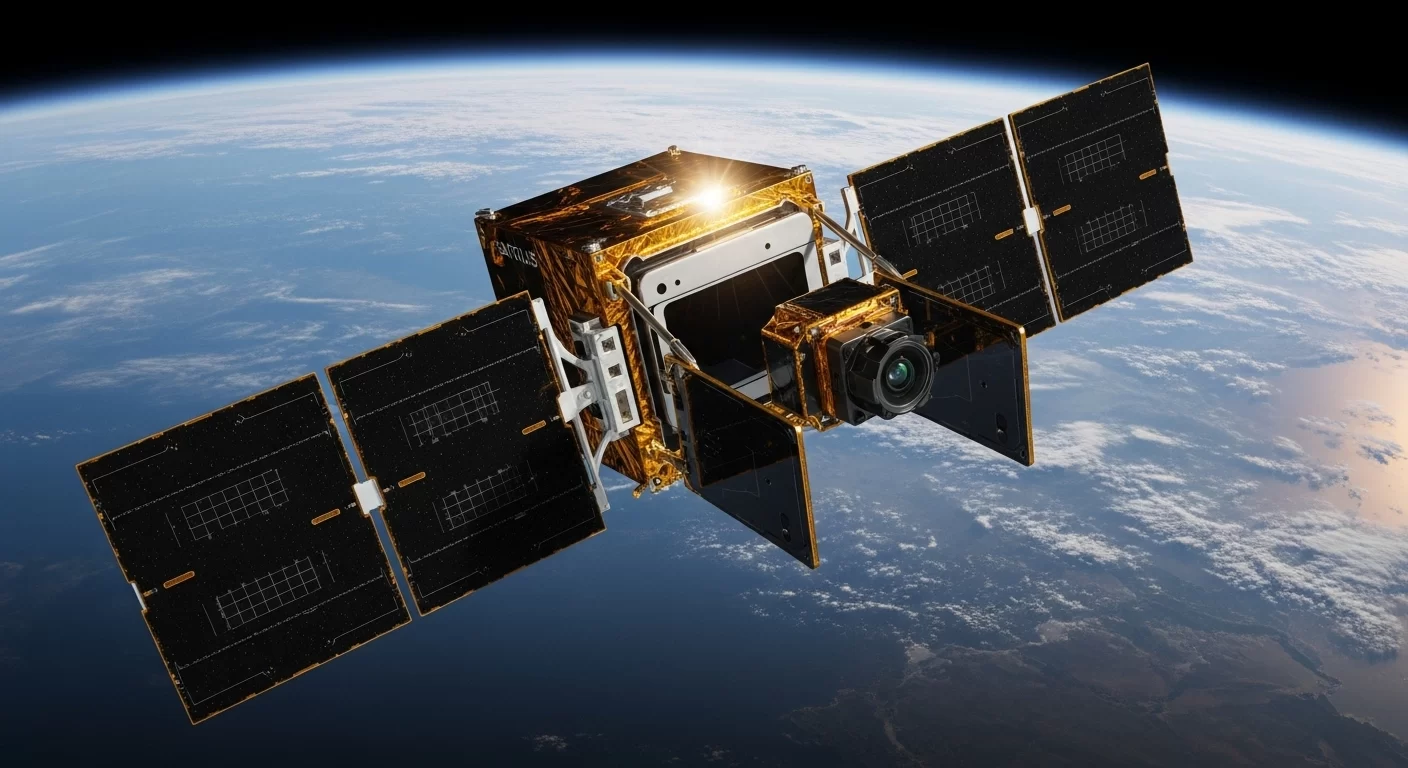
So, what does it take to build your own satellite like SATGUS? You’ll need similar hardware. Our unique payload involves two spring-loaded panels that rotate open once in space. On one side, we have a Google Pixel phone, safely tucked inside a radiation-resistant case, and on the other, a camera specifically engineered for the harsh space environment. Why a Google Pixel? Its tested durability, bright display, and Real Tone technology made it a perfect choice for capturing those incredible space selfies. T-Mobile, with their expertise in satellite coverage, also partnered with us to figure out communication.
Once your picture is beamed up to SATGUS, it’s displayed on the phone, the camera snaps an HDR image, and then that image is beamed back to Earth. And because you can’t just pop up to space to fix things, we built in an identical setup – a full backup system – on the other side of SATGUS. This redundancy is pretty common in spacecraft design; even the Mars Rover hardware I worked on had backups.
Powering a satellite in space isn’t as simple as plugging it into an extension cord. SATGUS relies on two fixed solar panels that funnel power into 120 watt-hour batteries. Optimally pointed at the sun, these panels can fully charge your phone nine times every 90-minute orbit.
Mastering Movement in the Vacuum of Space
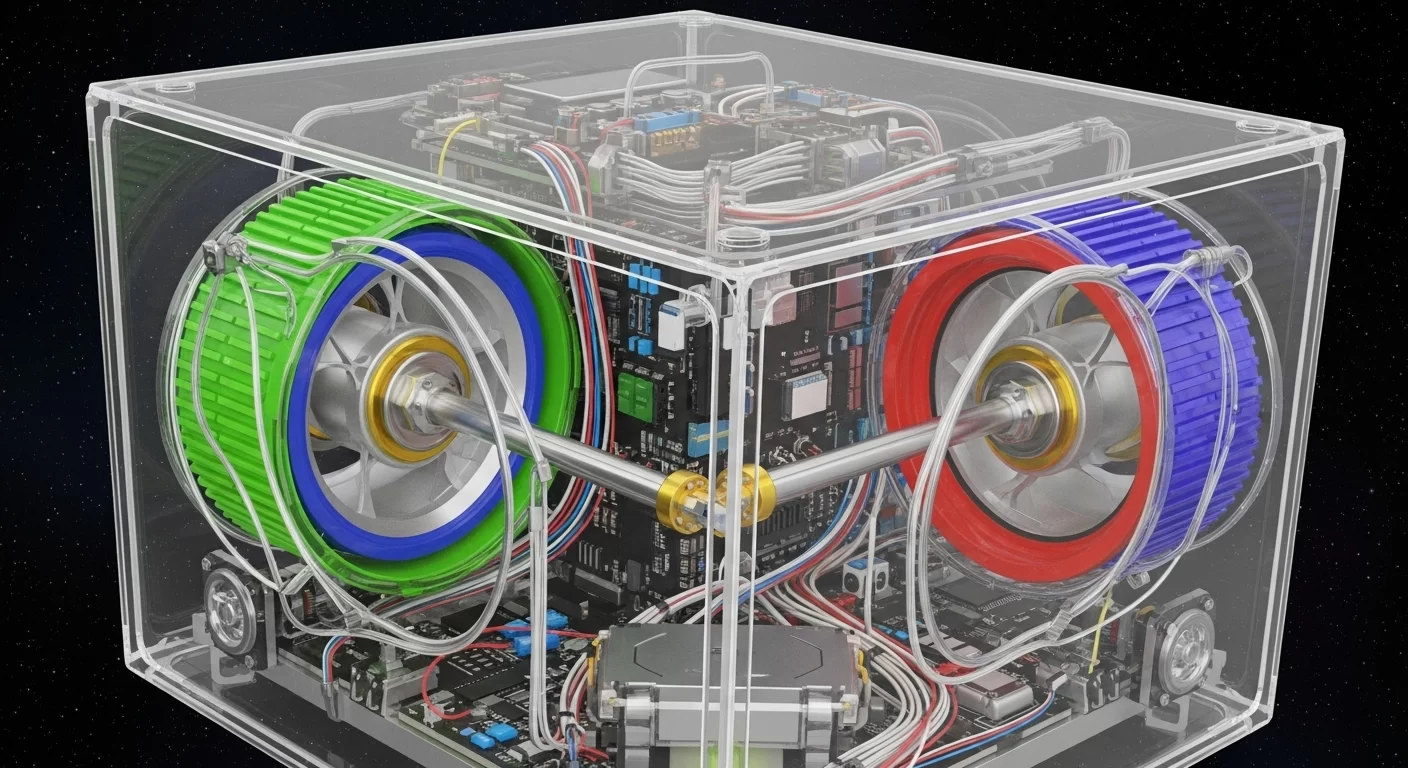
Here’s a puzzle for you: how do you move a satellite around in space when there’s no fuel, no thrusters, and no air to push against with propellers? It’s a fundamental challenge when you build your own satellite. The ingenious solution lies in spinning disks called reaction wheels. Because angular momentum must be conserved, if a flywheel spins one way, the satellite rotates the opposite way. By orienting three of these flywheels 90 degrees apart, you can precisely maneuver the entire satellite to any direction you need. This is crucial because SATGUS needs to point at the sun to charge, at Earth to send data, and down at Earth to take those perfect selfies.
As a backup, and to help ‘unspin’ the flywheels when they reach maximum rotation, we also use three torque rods, again, oriented 90 degrees to each other. These are remarkably simple yet brilliant! You can even make one yourself by wrapping wire around a piece of crystalline iron; running a current through it creates a magnetic field that aligns with Earth’s magnetic field, allowing for subtle orientation changes.
Staying Connected and Smart: Communication and Control
For your satellite to function, it needs to know where it is and what it’s doing at all times. GPS tells us its location, but for orientation, SATGUS uses an IMU (Inertial Measurement Unit) – just like the one in your phone that detects rotation. It also has two star trackers that photograph stars and match them against a catalog to determine its facing direction. When stars aren’t visible, two sun sensors locate the brightest spot in the sky for course measurements.
And finally, to talk to your satellite, you need radios. SATGUS has two: a UHF radio for low-data commands and telemetry, and an S Band radio for higher data rates, essential for transmitting those high-resolution pictures. The brain of the operation is the flight computer, which processes all the inputs from sensors and radios, making decisions on how to orient the satellite and when to snap pictures.
Step 2: Analyzing Your Spacecraft Design – Surviving the Harshness of Space
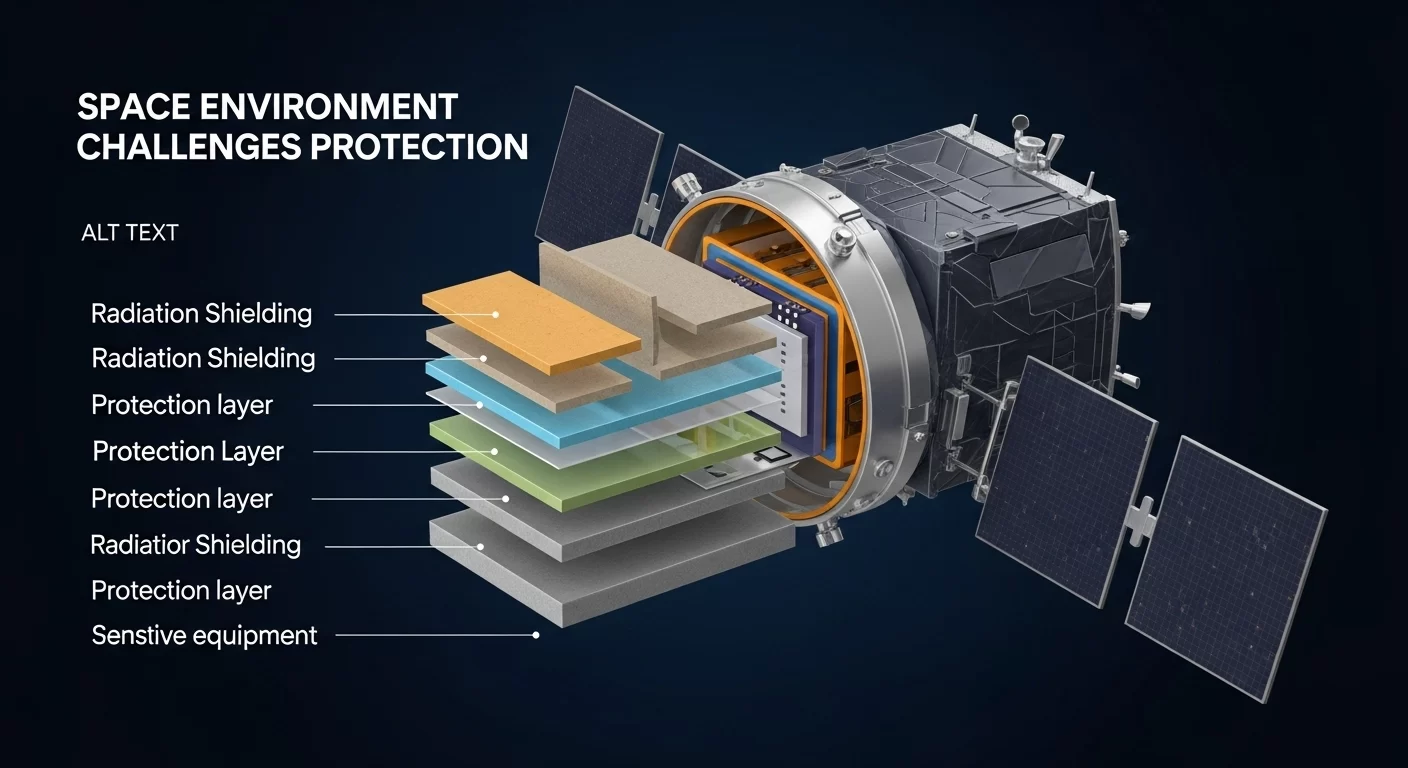
Once you’ve put together your digital design to build your own satellite, it’s time for a critical analysis. Space is a brutal environment, trying to “kill” your creation in four primary ways. We must investigate each threat and design protections against them.
The Vicious Vibrations: Shaking to Death
This challenge actually hits before you even get to space – during launch. The rockets needed to escape Earth’s gravity are incredibly powerful, creating violent rumbles that can shatter most everyday items. The biggest danger? Resonant frequency. Imagine pushing someone on a swing at just the right time, making them go higher and higher until something breaks. Every object has a resonant frequency, from your phone when dropped to your house in an earthquake.
To prevent your satellite from breaking apart, its hardware must have a resonant frequency above the rocket’s shaking frequency. How do we ensure this? We take our CAD model from Step 1 and turn it into a Finite Element Model (FEM). This involves dividing the entire structure into tiny “chunks” or a “mesh”. By solving simple physics equations for each chunk and how they interact, a computer can predict how the whole satellite will respond to vibrations. This ensures that both the entire satellite and its individual parts have resonant frequencies higher than the rocket’s shake, and can withstand the general forces during launch.
Temperature Turmoil: Burning and Freezing
Unlike Earth, which has a cozy atmosphere acting like a giant blanket, space has no atmosphere or wind to regulate temperature. This means that in a single 90-minute orbit, parts of your satellite can swing from a scorching 212°F (100°C) when in direct sunlight to a frigid -112°F (-80°C) in the shade. These extreme temperature swings would rapidly freeze or overheat delicate electronics if left unprotected.
Using that same FEM mesh, we analyze how heat spreads through the metal structure. This allows us to strategically place heaters, for example, near the flight computer to keep it warm in the shade, and apply surface coatings that act as radiators to prevent overheating in the sun.
Radiation Reckoning: Sunburn in Space
Here’s a startling fact: an hour in direct sunlight in space exposes your satellite to the equivalent of an entire year of sunlight on Earth. Our atmosphere offers incredible protection that’s absent in space. Extreme radiation from the sun and other sources can severely damage electronics. When you build your own satellite, you essentially need to apply “sunscreen” by shielding critical electronics behind thick enough pieces of metal or glass.
But how thick is “thick enough,” especially when every gram counts on a tight weight budget? We tested a Google Pixel in a radiation chamber that mimicked space conditions, blasting it with radiation until it failed after about 10 minutes. Knowing this failure point allowed us to calculate the precise thickness needed: 6 millimeters of aluminum and 5 millimeters of radiation-hardened glass for our phone enclosure. This ensures the electronics remain well below their radiation tolerance.
The Vacuum’s Vexation: Puffing Out
We often take air pressure for granted on Earth, constantly pushing back against the weight of the air molecules above us. In the vacuum of space, that pressure is gone. This is why astronauts need pressurized suits. While your satellite won’t wear a suit, certain materials like rubber, foam, and even lithium batteries can expand or release gasses in a vacuum. This “outgassing” can damage other sensitive equipment on board. So, when you build your own satellite, you must take precautions against these vacuum effects. There are other minor concerns like corrosion, but these four are the primary threats space poses to your future creation.
A Crowded Sky? Not Really!
You might look at those viral images showing Earth surrounded by a dense cloud of satellites and space debris and worry about collisions. It looks incredibly crowded, right?. The reality is, those images aren’t drawn to scale, much like a map showing daily flights across the United States.
In truth, the chances of a collision in orbit are incredibly low. Space is a million times less crowded with satellites than our skies are with airplanes, and how often do you see two planes nearly collide in the sky? To be absolutely sure, humans actively track over 44,000 satellites and objects larger than a baseball orbiting Earth. Furthermore, international rules dictate that satellites must be designed to burn up and disintegrate after a few years. SATGUS, for example, will only orbit for 1 to 3 years before it gracefully re-enters Earth’s atmosphere. This disintegration is quite spectacular, creating a glorious hot fireball as the satellite’s immense energy from traveling ten times faster than a bullet converts to heat through air friction. It’s an epic mic drop for a mission accomplished.
By the way, if you’re eager to get your space selfie before SATGUS’s honorable end, head over to spaceselfie.com. You can upload your picture, choose if you want a daytime or nighttime Earth photo-bombing, and even specify your hometown. We’ll tell you the exact moment the picture will be snapped, so you can go outside and wave, technically appearing in the photo twice!
External Link: about orbital mechanics
Beyond getting an out-of-this-world picture, submitting your selfie also earns you a free mission patch, and a chance to watch the rocket launch in California with the team! If you’re a CrunchLabs subscriber, it’s all free. CrunchLabs offers amazing Build Boxes for kids and Hack Packs for teens and adults, delivering fun mechanical toys and programmable robots right to your door. You build them, learn the cool science and physics behind them, and even tweak code to level up their capabilities. Some Hack Packs even contain a “platinum diploma” – a chance for free college tuition!
Learn more about Aerospace Engineering
Step 3: Building Your Spacecraft – From Digital to Physical
With the design analyzed and confirmed to withstand the brutality of space, you finally have the confidence to move on to Step 3: actually building the thing. This is where the digital blueprint comes to life! It’s a thrilling stage where all those CAD models and finite element analyses translate into tangible hardware.
Once your space hardware is assembled, a comprehensive hardware-software test is crucial to ensure everything works exactly as designed. For SATGUS, this involved unfurling and testing the solar panels, deploying the camera and screen, and running full selfie upload and transmission tests. Remember, redundancy is key in space. Even though we hope to never use the backup, SATGUS has two Redwire cameras and two screens – just in case the primary system encounters an issue. After all, you can’t just send a repair crew up to space. Once all systems are GO, it’s time for the final touches… though sadly, googly eyes aren’t allowed in space!
Step 4: The “Shake and Bake” – Proving Your Design
Now that your satellite is built, it’s time for what we at NASA call the “shake and bake”. This step validates all those predictions made during the design analysis in Step 2. It’s about putting your spacecraft through rigorous tests to prove it can handle the extreme vibrations of launch and the drastic temperature fluctuations of space.
For the “shake” part, we attach SATGUS to a massive shake table and vigorously shake it in all three directions. We also vary the frequencies to uncover any unexpected resonant frequency issues. The intensity of this shake test is actually a bit more severe than what the satellite will experience on the launch pad. If it survives this, you have both analytical and practical proof that your spacecraft design will endure the ride to orbit. It’s also a crucial check to ensure no fasteners come loose, as vibrations can cause them to unscrew.
The “bake” test involves placing SATGUS in a vacuum oven that mimics the space environment. We cycle it through maximum and minimum temperatures three times, even operating the satellite at these extremes. This provides peace of mind that your satellite won’t freeze or burn to death, and will perform flawlessly in the vacuum of space. Once these tests are complete and everything is still functioning perfectly, your satellite is loaded into its launch dispenser, ready for its grand journey. This dispenser is quite clever; it has rubber isolation dampers where it connects to the satellite, further reducing the shaking during launch. It’s similar to how tall skyscrapers use dampers to limit earthquake vibrations.

Step 5: The Launch Pad – Your Ticket to Orbit
With your meticulously built and tested satellite packed up, the next stop is the launch pad! For SATGUS, our ride to orbit is a SpaceX Falcon 9 from Vandenberg Space Force Base in California. If you’re looking to build your own satellite and launch it, SpaceX is highly recommended due to their affordability and surprisingly straightforward booking process – it’s almost like ordering a pizza, letting you select orbit, launch date, and even add-ons.
Strategic Launch Locations
You might wonder why Vandenberg, California, is chosen for launches like SATGUS. It’s all about strategy for the desired orbit. To capture pictures over every spot on Earth, we need an orbit that circles “this way” (polar or near-polar), giving full coverage as the Earth rotates underneath. Spy satellites use similar orbits for global surveillance. To achieve this, rockets need to launch south and, for safety, over water. Vandenberg’s west coast location is ideal for launching south over the Pacific Ocean.
In contrast, if you’re sending something to Mars and need to escape Earth’s gravity entirely, you want to launch as close to the equator as possible. Why? Because the Earth rotates eastward at about 1000 MPH at the equator. This eastward boost saves a significant amount of fuel compared to launching from higher latitudes. That’s why such missions from the U.S. typically launch from Florida or Texas, as far south as possible, with safe eastward trajectories over water.
Riding the Rocket: The Falcon 9 Experience
SATGUS won’t be alone on its journey; anywhere from 50 to 100 other satellites hitch a ride inside the Falcon 9’s nose cone, known as the fairing. This fairing is surprisingly large, big enough to house a school bus. Below that are the massive fuel tanks and nine powerful engines for the main booster, with a smaller set of tanks and a single engine for the upper stage.
The liftoff is incredibly dramatic and powerful, equivalent to setting off nearly 8,000 sticks of dynamite! Just about 2.5 minutes after launch, traveling at 3700 MPH, the main booster separates. What’s truly incredible is that this booster then autonomously flies itself back to a landing pad on Earth, ready to be reused for another flight. This reusability is a game-changer for satellite launch process costs, making space access significantly cheaper.
The remaining single engine then fires up, pushing the upper stage further. Thirty seconds later, about three minutes after launch, the fairing splits in two, peeling away and exposing all the satellites to the vacuum of space. The engine continues accelerating for another five minutes, reaching an astonishing speed of five miles per second – that’s ten times faster than a bullet! Nine minutes after launch, the engines cut off, and the satellites silently coast for nearly an hour. Over the next two hours, the rocket meticulously deploys each satellite, one by one, as it completes an orbit around Earth.
Step 6: Operations – Life in Orbit
Congratulations, your creation is now in space! The final step in your bootstrapped space program is operations. After a couple of hours, SATGUS sends its first signal back to mission control, confirming everything is going great. Soon after, it stretches out its solar panels and deploys its camera and screen. From our mission control room, we’ll constantly monitor all its vitals.
After a few weeks of rigorous confirmation that all systems are in perfect working order, SATGUS will begin its main mission: taking selfies. It will continue to snap pictures every single day until it reaches its honorable end, typically anywhere from 1 to 3 years.
See our guide on Satellite Operations
Step 7: The Grand Finale – An Honorable End
Wait, an end? Yes, all good things must come to an end, even satellites. As a satellite’s orbit naturally decays over time, it gradually encounters more and more air molecules in the very upper reaches of the atmosphere. This increasingly dense air creates drag, slowing the satellite down. Because a 55-pound satellite traveling ten times faster than a bullet carries an immense amount of energy, this air friction dramatically builds up heat. The result? Your satellite will disintegrate spectacularly in a glorious, hot fireball upon re-entry. It’s honestly a pretty epic way to “mic drop” a mission that’s been fully accomplished!
The journey to build your own satellite like SATGUS was over three years in the making for our team. The process, from digital design to the final fiery re-entry, is a testament to human ingenuity and our enduring wonder of the cosmos. Sharing that wonder is truly special, and it fills me with hope for the next generation of problem-solvers.
Source: https://youtu.be/6KcV1C1Ui5s
Frequently Asked Questions (FAQs)
1. How long does it take to build your own satellite like SATGUS? Building a satellite like SATGUS can take a significant amount of time, with the project mentioned taking over three years of development with a dedicated team. This includes extensive design, analysis, building, and testing phases.
2. How much does it cost to launch a satellite as a civilian? While launching a satellite used to cost tens of millions of dollars, opting for a CubeSat design can drastically reduce costs to hundreds of thousands of dollars. Companies like SpaceX have also made launch options more inexpensive and accessible.
3. What are the main challenges a satellite faces in space? Satellites in space face four primary threats: extreme vibrations during launch, drastic temperature swings (from 212°F to -112°F in a single orbit), harsh solar radiation, and the vacuum of space which can affect materials.
4. How do satellites move or change orientation in space without fuel? Satellites like SATGUS use reaction wheels, which are spinning disks. By changing the spin speed or direction of these internal flywheels, the satellite itself rotates in the opposite direction due to the conservation of angular momentum. Torque rods, which interact with Earth’s magnetic field, can also assist.
5. How long do satellites typically stay in orbit? The lifespan of a satellite in orbit varies, but for smaller CubeSats like SATGUS, it’s typically 1 to 3 years. After this period, their orbit decays due to atmospheric drag, leading to a fiery re-entry and disintegration.

Comments